Options &
Customizing
Your Addresses
About
Your Addresses
NEO needs to know which addresses are yours in order to automatically organize your messages. If all your addresses are not entered, your messages will not appear correctly.
Note that NEO must know all your addresses - not just your currently used ones. Be sure to include your old addresses if you have messages that used them.
Auto-detecting
your addresses on catalog creation
NEO automatically detects your addresses when you create a catalog, and you can add to the list NEO auto-detects. Addresses you enter are displayed in bold.
Important Note: NEO does not auto-detect addresses you use after creating the catalog. You have to enter these manually.
Adding
and removing addresses
You can add addresses and you can remove addresses you add. Addresses NEO auto-detects can not be removed - however, you can choose not to include them by unchecking them).
Click the Application Button menu | Your Addresses to keep your addresses up to date.
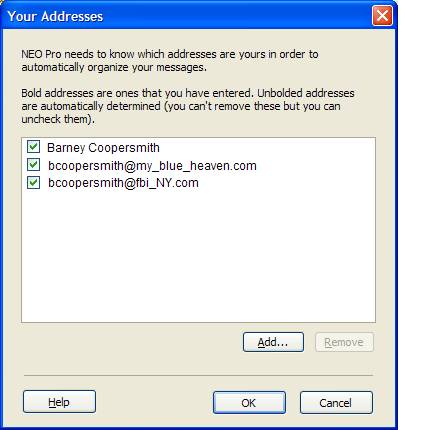
To add an address, click the Add command. POP3 email addresses are entered in
the usual way (e.g., bcoopersmith@fbi_NY.com). Exchange Server addresses are enter in X.500 format.
Options
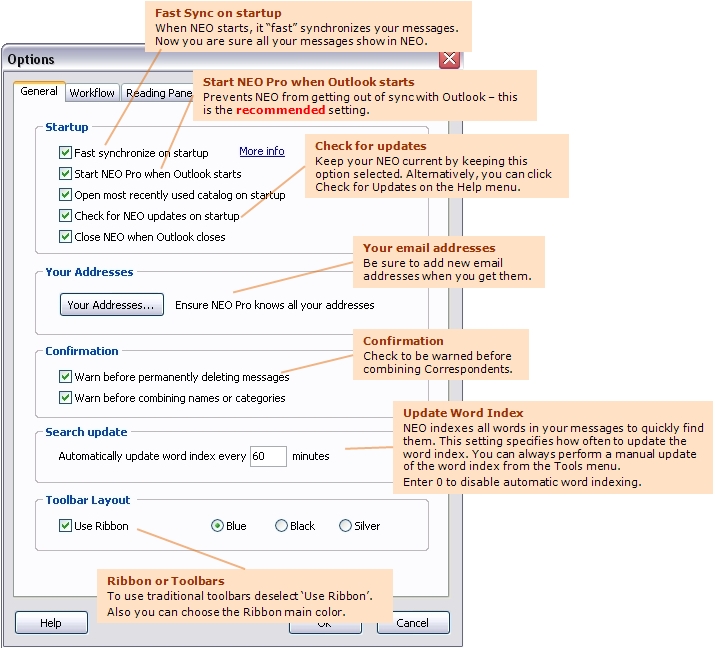
General Options
These options control NEO startup and other general settings.
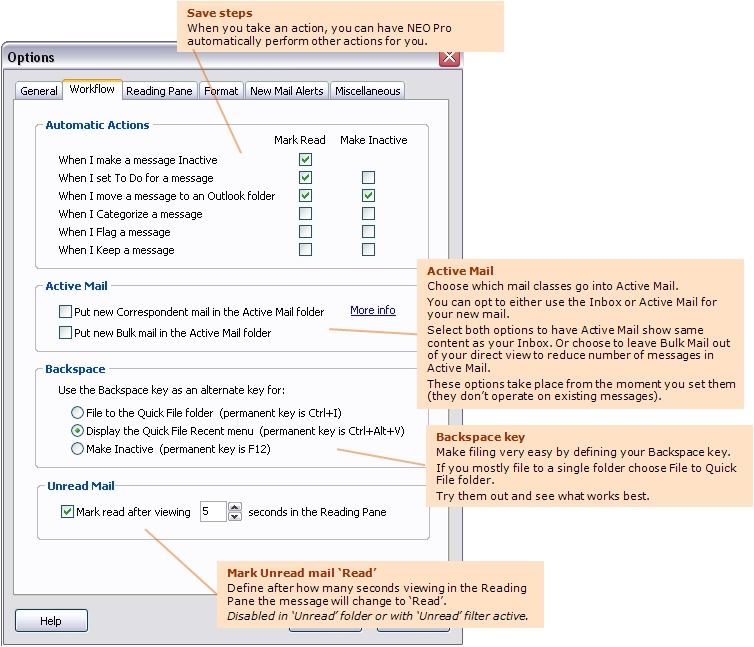
Workflow Options
These options help you configure what happens when you take action on messages, whether Active Mail operates, and how you want Backspace to work.
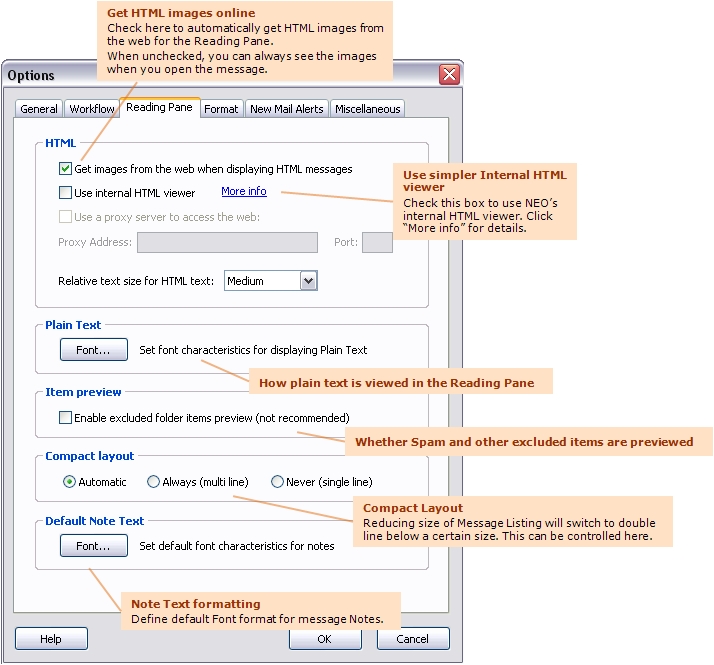
Reading Pane Options
These options relate to the Reading Pane.
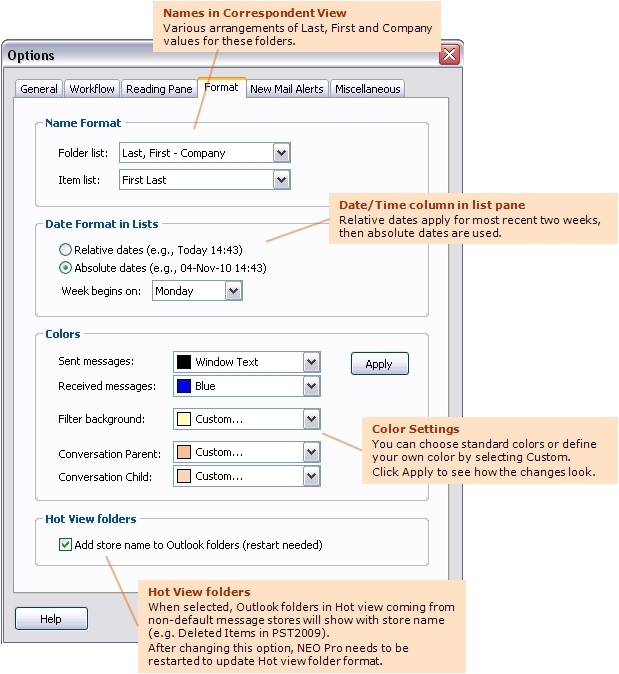
Formatting Options
These options set how items are formatted.
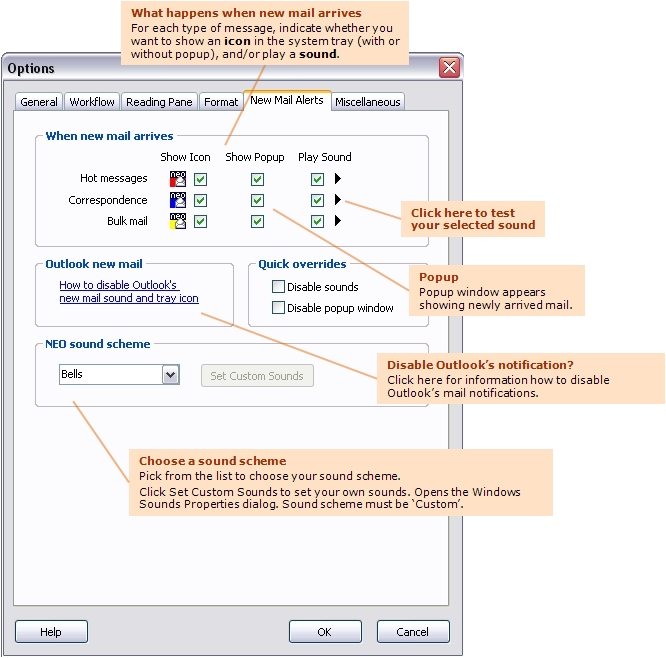
New Mail Alert Options
These options set automatic notifications that take place when new mail arrives (you can also learn how to change Outlook's new mail settings).
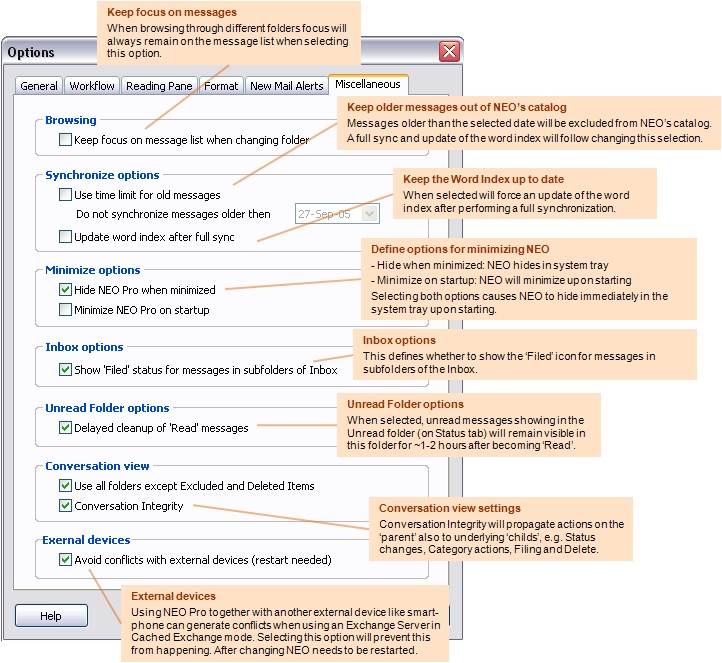
Miscellaneous
options
In this tab several additional options can be set as described below.
Other
Ways to Customize
Resizing the
Reading Pane
The Reading Pane can be positioned either at the bottom or to the right of the screen. This can be defined on View menu. Size of the Reading Pane can be changed to any desired size by dragging the pane separator to a new location. Switching off the Reading Pane is done on the View tab.
Note that you don't have to see the Message List pane in order to read them in the Reading Pane. You can use the following shortcut keys to move from message to message:
Ctrl + Up Move to previous message
Ctrl + Dn Move to next message
Resizing
panes
The panes in NEO can be resized. Place your cursor on the divider between the panes you want to resize and drag in desired direction.

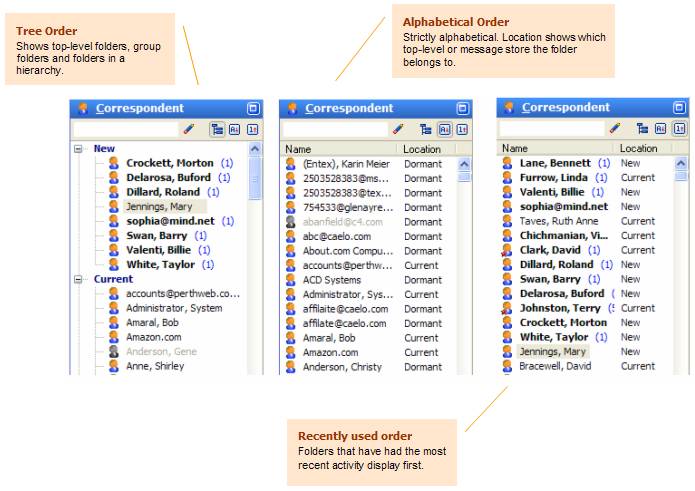
Changing
Folder List sort order
Each view can have its own sort order. Change the sort order by clicking one of the three buttons at the top right.
Changing Reading
Pane fonts
There are three message formats for the Reading Pane: HTML, Microsoft Outlook Rich Text, and Plain Text. Here's how the change the text characteristics.
HTML
messages
Change the relative size of HTML text in two ways:
· Click View menu | HTML Text Size.
· Set on via Reading Pane options (Tools menu | Options | Reading Pane tab)
Plain
text messages
Change the characteristics of Plain Text messages:
· Set on via Reading Pane options (Tools menu | Options | Reading Pane tab)
Microsoft
Outlook Rich Text
This message format cannot be modified in the Reading Pane.
Moving
the View tabs
The NEO View tabs are positioned by default at the top of NEO because the tabs are easier to access there. You can position them at the top or the bottom of NEO.
Right-click on any part of the View tab and make your selection:

Undocking
and docking views
When you start NEO for the first time you will see the default NEO workspace. In it, Hot view is in the top left panel, Outlook and Correspondent views are below it, the List Pane is in the middle and the Reading Pane is to the right of it.
The top left view is the home view position. When you click a view on the Viewtab, it replaces its contents. The home view position, the List Pane and Reading Pane cannot be moved but they can be resized.
Optimize
view positions to suit your workflow
All view positions are configurable in NEO. You can undock any view and have it float above your workspace, you can dock the views onto the workspace surface in any position, you can change the order of the views on the View tab, and you can even hide a view.
From the View | Layout tab, you can load a predefined view with NEO views left and right of the Message Listing / Reading Pane. To illustrate, here's an example layout with views left and right.

Save
your Layout settings by exporting them
When you have finalized setting your layout, it is best to save your layout settings by exporting them: View | Layout | Export Layout.... When it is necessary to reset your User Interface it is easy to restore your layout by importing the saved settings.
How to reset the User Interface
When you like to restart with the original layout, or when the User Interface needs to be reset:
Reset your layout On the View menu, click Layout | Reset Layout. This will restore your layout to the default layout.
Reset User Interface Close NEO, click Ctr+Shift while double-clicking NEO icon to start the program. Confirm dialog to reset the User interface settings.
Configuring
your views
The key point to remember when moving views is that a view can only be moved to a new location when it is undocked (floating).
Undock a view that is currently docked on the Viewtab
Double-click the view on the Viewtab.
Undock a view that is currently docked on the workspace surface
Double-click the titlebar of the view panel.
Dock an undocked view back onto the Viewtab
Drag the floating toolbar's titlebar on top of the Viewtab. As you move it over the tabs, drop it when the insert indicator appears.
Dock a view onto the workspace surface
If it is not already undocked, double-click the tab (if on the Viewtab) or double-click the titlebar (if already docked on the workspace surface).
Now that it is undocked, drag it by the titlebar to a dockable location. As you get close to a location it will snap into place with a line marker indicating its location. Drop it where you like.
To move it so that it appears as a vertical column, place your cursor exactly on the juncture between two stacked panes (for example, the dividing line between the List Pane and the Reading Pane).
To hide a view, press Alt+F4 when the view has the focus and is undocked.
To restore a hidden view, go to View menu | click Views then click the view you want to make visible again.
Adding and changing
columns
Column
sort order
Sort your messages by changing the column sort order.
![]()
The indicator on the Date/Time column signifies the current sort column. Click it again the change the sort direction, or click another column to change the sort column.
Each folder can have a different sort order.
Changing
column width
Place your cursor at the start of a column until the resize icon appears (see below), then drag it right or left.
![]()
When you change the column width for a view, it changes for all views except Attachment view which can be set independently.
Changing
column order
Left-click drag the header of a column and drag it to the new location.
Selecting
which columns to display
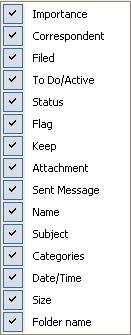
Right-click on any column. This list of available columns will appear for you to check or uncheck.
List
pane Name column
The Name column in the List Pane shows the From name for incoming messages and the To name for outgoing messages. This is fine for simple correspondence between you and another person.
For mailing list messages, however, the actual originator of the message is different than the Folder name. In fact, there are often many different originators and it's important to know who the message is from in addition to the list the message is to.
Here are the different ways to set this property:
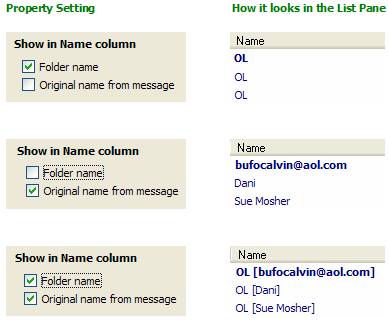
Notice above that the folder name is very short to make more room for the original name. Also, specifying the folder name in upper case makes it stand out from the original name.
You can set what's included in the Name column by right-clicking any Correspondent or Bulk Mail folder and choosing Properties.
Customizing
the ribbon
By default, NEO comes with a Ribbon with a Quick Access Toolbar on top of it. You can customize these in several ways:
· Add commands to the Quick Access Toolbar
·
Customize the Ribbon
- add
commands
- modify
commands
- remove
commands
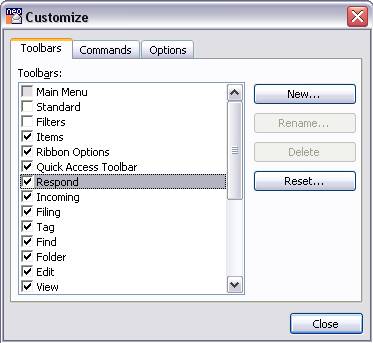
When switching to Toolbars, standard Windows toolbar customization can be made.
It's very useful to modify your Quick Access Toolbar to add commands and filters you use frequently, or remove ones you use infrequently.
Hide or show the Ribbon
To save space, the Ribbon can be minimized by clicking Ctrl+F1. Clicking this shortcut again will show the Ribbon again (or right-click and (de)select Minimize Ribbon).
When minimizing the Ribbon, make sure all your frequently used commands sit on the Quick Access Toolbar.
Customize
Quick Access Toolbar
Right-click any command and select Add to Quick Access Toolbar.
To change order of the Quick Access Toolbar, right-click anywhere on the Ribbon and select Customize. Once in Customize mode, commands on the Quick Access Toolbar can be dragged into any position.
Customize the Ribbon
Customize the Ribbon by right-clicking anywhere on the Ribbon and choose Customize.
You can reset any Ribbon parts back to its original state.
Add a command
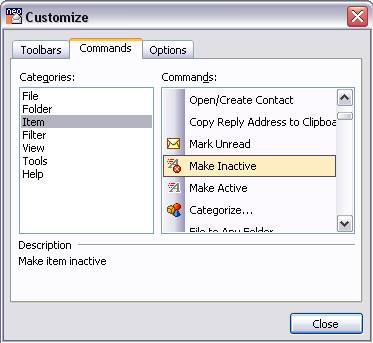
Select Commands tab, select a Category and then locate the desired Command. Drag and drop the command onto the Ribbon in the location you want.
Modify a command
With the Customize dialog visible, right-click a command on the Ribbon. A grey box should appear around it to show you are in edit mode and the command edit menu will appear.
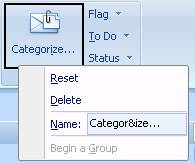
Delete a command
Modify a command as per above, and choose Delete or drag it away from the Ribbon.
Customize
menu and toolbar options
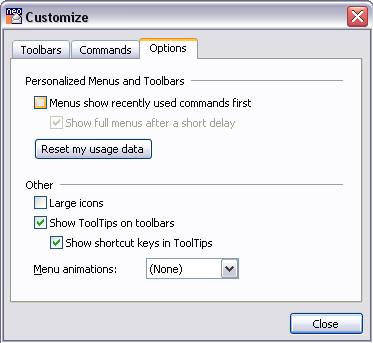
You can change the behavior of the menu and toolbars by going to the Options tab of the Customize dialog.
Master
and user-defined categories
In NEO Pro, the categories you assign may be ones you define, or they may be ones you pick from the Master Category List.
Regardless of whether they are defined by you or picked from the Master Category List, once assigned to messages there is no difference between a master or user-defined category.
Master
categories
There's really nothing complicated about master categories or the Master Categories List. The "list" is simply a list of categories stored in your registry. Outlook delivers a list to get you going, but you can and should improve on it if you plan to use Master Categories at all.
At best the Master Categories List serves as a pick list from which to choose regularly occurring categories.
User-defined
categories
There is no limit to the number of categories you can add, which makes them ideal for organizing your projects and activities. You can add your own categories to the Master Category List if you like. Selecting the appropriate option on the Category Picker (Ctrl+T), you can add all your user-defined categories to the Master Category list.
Email Improperly
Configured on your computer
You may receive an error issued from Microsoft Outlook when you start Outlook or NEO. Here's how to address the problem.
Ensure you are
running the correct Microsoft versions
NEO works with all Microsoft Outlook versions but does not work with Outlook Express.
NEO also works with Exchange Server. For Exchange Server Version 5.5 Exchange Service Pack 3 or above must be installed. For Exchange 2000 Server, Exchange Service Pack 2 or above must be installed. Your Exchange administrator can provide this information.
Other ways email
may not be properly configured
NEO requires that both Microsoft Outlook and MAPI are properly configured on your computer. MAPI is an email subsystem that is normally installed when you install Microsoft Outlook.
However, components of Outlook and/or MAPI can get corrupted. This can occur when you change versions of Microsoft Outlook or add new features, when you change modes such as from Internet Only Mode to Corporate or Workgroup mode, or when you use some other email programs that replace the correct version with their own versions of MAPI.
Here are the steps to take to ensure your email subsystem is properly configured. All steps may not be required. You may want to print this topic by clicking the Print command on the Help toolbar.
1. Close NEO, Outlook and any other programs you have running. To be absolutely sure no email component programs are running it is best to restart your computer (assuming such programs don’t start automatically on startup). The following steps will not work if any part of MAPI is running.
2. Ensure “Microsoft Outlook” is your default email program. To change the setting: click Start, point to Settings, click Control Panel, then double-clicking the Internet Options icon. Click the Programs tab, then choose Microsoft Outlook as the E-mail program. Do not choose Outlook Express.
3. Run the Microsoft FixMAPI program. This program does not exist on all computers. To find whether it exists on your computer, click Start, point to Find then click Files or Folders. Enter fixmapi.exe in the Named field and click Find Now. If it is found, perform the following substeps:
o Click Start, point to Find then click Files or Folders. Enter mapi32.dll in the Named field and click Find Now. Right-click each copy found, click Rename and enter mapi32.old . If you are not able to rename all files then MAPI is running and you should perform step 1 above. Close the Find program.
o Click Start, click Run, enter fixmapi.exe in the Open field and click OK. This will run quickly and provide no confirmation information that it has completed.
o Restart your computer and try NEO.
4. Re-install Microsoft Outlook. Perform this step ONLY if step 3 above was unsuccessful.
o Click Start, point to Settings then click Control Panel. Double-click the Add/Remove Programs icon and then double-click Microsoft Outlook from the list. Have your install CD handy.
o After re-installation, restart your computer and try NEO.
If none of the above steps correct the problem, please send an email to support@caelo.com describing your symptoms and what steps you have taken.